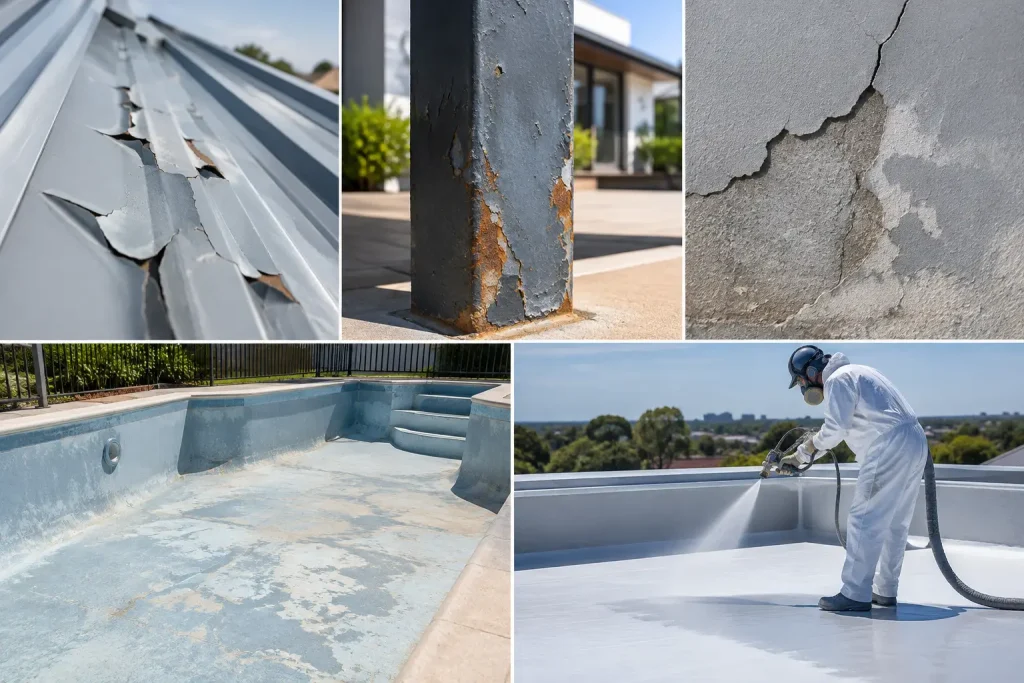
A coating rarely fails for just one reason. The visible problem may be peeling paint, bubbles or an uneven sheen, but the cause often sits underneath: surface contamination, trapped moisture, weak old paint or the wrong coating system. These coating failure examples help homeowners, painters and maintenance teams identify what they are seeing before selecting a repair method or applying another coat.
Getting the diagnosis right matters. Applying fresh paint over an unstable surface can make a job look better briefly, then repeat the same failure as the new film loses its bond. Good preparation takes time, but it is usually the part that determines whether the finish performs as intended.
Coating failure examples worth recognising
1. Peeling and flaking
Peeling occurs when the coating loses adhesion and lifts from the substrate or from the layer beneath it. It may start around edges, joins, cracks and areas exposed to standing water, then spread in larger sheets. On exterior walls, roofs and metal surfaces, peeling is often associated with weathered paint, surface chalk, dirt, oils or inadequate preparation before recoating.
The first question is where the separation has occurred. If the paint has come away cleanly from the substrate, the surface may not have been properly cleaned, sanded or primed. If the old coating itself is splitting into layers, there may be an incompatibility between coating types or a weak existing film that should have been removed.
The practical fix is not to paint over loose edges. Remove all poorly bonded material until you reach a sound surface, clean away dust and contaminants, then use the correct primer or sealer where the coating system requires it. Check the product technical data sheet for suitable substrates and preparation requirements before choosing the topcoat.
2. Blistering and bubbling
Blisters are raised bubbles in the coating film. Some appear shortly after application, while others develop months later as moisture, heat or vapour pressure acts beneath the paint. On roofs, hot weather and a damp substrate can make blistering more likely. On masonry, moisture moving through the surface can put pressure on the coating from behind.
Not every bubble has the same cause. Freshly applied bubbles may be linked to application technique, excessive film build, applying in unsuitable weather or coating over a surface that has not dried properly. Older blisters may point to water ingress, failed sealants, ponding water or moisture within the substrate.
Cutting open a small blister can help reveal the cause. A dry, clean underside may suggest an adhesion or application issue. Moisture beneath the film needs further investigation before recoating. Simply sanding the bubble flat and painting over it can trap the problem again.
3. Chalking
Chalking is the powdery residue that comes off when you rub a painted surface with your hand or a dark cloth. It is common on sun-exposed exterior coatings as the binder slowly breaks down and leaves pigment at the surface. Mild, even chalking on a weathered wall may be manageable with thorough washing and preparation. Heavy chalking is a different matter because new paint may adhere to the powder instead of the sound substrate.
A pressure wash alone may not always remove embedded chalk, especially on rough masonry or aged roof coatings. The surface needs to be clean, dry and stable before applying a compatible coating system. In some cases, a suitable sealer or primer is needed to bind a porous or chalky surface. The right option depends on the substrate and the coating being applied over it.
4. Cracking, crazing and alligatoring
Fine cracks can look like hairlines, while alligatoring forms a larger pattern of cracked, plate-like sections. These coating failures often occur when the paint film becomes brittle with age, when a new coat is applied too heavily, or when a hard coating is placed over a softer or flexible layer.
Cracking can also follow substrate movement. Timber, fibre cement, metal and masonry each move differently as temperatures and moisture levels change. A coating selected without regard for that movement may eventually split, particularly around joins and exposed edges.
Light surface cracking may be repairable after sanding back to a firm edge. Deep cracking through multiple coats calls for more thorough removal and an assessment of the coating system below. If cracks continue into the building material, concrete or render, address the substrate condition before coating it.
5. Poor coverage and patchy colour
Patchiness is not always a coating failure, but it is a frequent finish problem. It can appear as uneven colour, dull patches, flashing or variable sheen. Common causes include inconsistent surface porosity, missed primer, uneven spreading rates, insufficient stirring or applying the product too thinly.
Porous repaired areas are particularly prone to flashing. A patch may absorb more of the coating than the surrounding surface, changing both appearance and sheen. On walls and masonry, a compatible sealer or primer helps create a more uniform base. On larger areas, maintaining a wet edge and working methodically reduces lap marks.
Colour variation can also result from using different batches without mixing them together first, or applying coats at different thicknesses. For a consistent result, check that the substrate is uniformly prepared, use the recommended application method and allow each coat to dry as specified before assessing the final finish.
6. Rust staining and corrosion under coatings
When rust stains bleed through paint on steel or metal roofing, the visible orange mark is usually only part of the issue. Corrosion can develop under a coating where moisture reaches exposed metal through scratches, failed edges, fasteners or areas of poor adhesion. Painting over loose rust may hide it temporarily, but it does not create a stable foundation for the next coat.
Preparation needs to remove loose corrosion and failed coating, then bring the surface to the preparation standard required by the selected primer. Bare metal and previously coated metal may need different treatment. Pay close attention to laps, screw heads, cut edges and areas where water collects, as these are common starting points for coating breakdown.
7. Pool paint loss and softening
Swimming pools place different demands on a coating system. Paint loss, softening, blistering or staining may be linked to the existing pool surface, the previous coating type, moisture in the substrate, chemical exposure or inadequate surface preparation. The remedy depends heavily on whether the pool has been previously painted and, if so, what product was used.
Do not assume every pool can be recoated with the same paint. Chlorinated rubber and two-pack epoxy systems have different preparation and compatibility requirements. A pool should be empty, properly cleaned and dry in accordance with the relevant product instructions before any coating work begins. If the old finish is unknown, assess a small prepared test area or seek product guidance before committing to the full surface.
Before purchasing pool paint and primer, use the BG Pool Paint Calculator to estimate quantities from the pool dimensions or water volume and the existing surface type. It is a practical way to plan the system, reduce uncertainty and avoid ordering too little or far more product than the job requires.
How to respond before recoating
The best response to a failure is usually methodical rather than fast. Start by identifying whether the issue is localised or widespread. A small damaged area around a gutter, pool fitting or metal fastener may have a specific moisture or corrosion source. Widespread peeling, chalking or cracking usually points to a broader preparation or compatibility problem.
Then check the substrate. It should be sound, clean and dry, with loose coating, dust, grease, salts, mould and other contaminants removed as appropriate. Repairing the coating without dealing with water ingress, corrosion or failing sealants can lead to the same result again.
Finally, select a compatible system rather than choosing on appearance alone. Primer, sealer and topcoat each have a role, and not every surface needs every layer. Technical data sheets and safety data sheets provide the product-specific details on preparation, application conditions, mixing, recoat intervals and suitable surfaces.
A durable finish starts with an honest assessment of what is already there. If the cause is uncertain, take clear photos of the affected area, note the surface and any previous coating details, and ask BG Coatings for practical product-selection guidance before you begin.